Showing posts with label fedora. Show all posts

List of virtual adapters your Virtual Linux can access

Hello ,

Its me again Raja and this time I came up with one more new post.

I have been through interesting problem.

As many of you know Virtual Box , sometimes even though we enable new adapter and configured IP in conf file it wont comes up. Everything seems fine , we have enabled adapter and configured name and IP for it but still it wont come up.

Simple solution : How many adapters your VM able to access can be easily know by using command

                             ls /sys/class/net
  In my case I have 3 adapters so it will display them

root@fresh:~# ls /sys/class/net
enp0s3  enp0s8  lo
root@fresh:~#

If you come across errors like device not found errors , try to found out how your VM identified the adapters that you have enabled.

Hope it helps.

Thank you.

Linux : full path of a file

Hello ,

Sometimes we need to have full or absolute path of file. And most of the times we used to pwd + filename manually.

But with google search I came across a command named as readlink.


readlink -f filename.txt

that will print complete path of filename along with filename append to it.

linuxmen@linuxmen-fresh:~/test/test1$ readlink -f ex4.js
/home/linuxmen/test/test1/ex4.js
linuxmen@linuxmen-fresh:~/test/test1$  

Note : make sure you are same directory where file resides else give relative path to file.

Hope it helps

Suspended Jobs vs Running jobs in Linux

Background Job : A job which is running background in the same shell. You can use bg command to see any background jobs.
Foreground job : A Job which is running in the same shell right before your eyes.
Suspended Job : Its a stopped/pause job but you can resume their running.
Let me explain with example very clealy
virt00# sleep 180
^Z
zsh: suspended  sleep 180
virt00# jobs
[1]  + suspended  sleep 180
virt00# bg
[1]  + continued  sleep 180
virt00# fg
[1]  + running    sleep 180
^Z
zsh: suspended  sleep 180
virt00# jobs
[1]  + suspended  sleep 180
virt00#
I have started a Job named sleep 180 then I stopped with CTRL+Z . right now my job is in suspended mode.
I see it by typing jobs command. Now I want to resume its running in background so I typed bgcommand then it will move from suspended state to running state but in background it will run.
now I typed command fg to bring it foreground , now job wont get stepped but it will pull from background jobs queue and push into foreground jobs queue.
So yes background jobs and foreground jobs always are in running state.

Deny SSH access to particular users

We all know SSH is very famous and the best service for remote access.

Today I am going to tell you how to block or allow only particular users or group from SSH access.

open sshd_config file as per your environment

in Debian

vim /etc/ssh/sshd_config


Then add below line to enable access for only below users

AllowUsers username1 username2


to deny access for only below users add a line as

DenyUsers username1 username2


as in the same way

AllowGroups group1 group2


and to deny groups

DenyGroups group1 group2


 But there is something very important you have to follow here. It is the order of mentioning.

From manpage of SSH 

The allow/deny directives are processed in the following
      order: DenyUsers, AllowUsers, DenyGroups, and finally
      AllowGroups.

So first mention DenyUsers and then AllowUsers then only it will works and same for DenyGroups and AllowGroups

Hope it helps.


Installing Chef server in your CentOS 6.7 easily.

I have tried to install chef in my CentOS 6.7 but it was like complicated thing till today.

So many problems I have faced and I am giving them as precautions to you.

1. You should have minimum 1 Mbps unlimited connection. Atleast 5 GB data you are going to download.

2. Always you have to choose your current OS version builds, If you choose other version builds you will be stopped with library issues.

3. Atleast 6 - 7 GB of freespace

and Lot of patience.

I will give you in a simple way. Just open your terminal and turn into root user if you were not.

Then Download files from below links. Open them via browser and get the final link and download in your way.

1. https://packagecloud.io/chef/stable/packages/el/6/chef-server-core-12.3.1-1.el6.x86_64.rpm/download

2.https://packagecloud.io/chef/stable/packages/el/6/opscode-reporting-1.5.5-1.el6.x86_64.rpm/download

3.https://packagecloud.io/chef/stable/packages/el/6/opscode-push-jobs-server-1.1.6-1.x86_64.rpm/download

4.https://web-dl.packagecloud.io/chef/stable/packages/el/6/chef-sync-1.0.0~rc.7-1.el6.x86_64.rpm

5. https://packagecloud.io/chef/stable/packages/el/6/chef-manage-2.1.1-1.el6.x86_64.rpm/download

6. https://opscode-omnibus-packages.s3.amazonaws.com/el/6/x86_64/chefdk-0.10.0-1.el6.x86_64.rpm


After download all these files place them in any directory.

Now let us assume these files are in /home/mypc/chef directory.


Step 1:

rpm -ivh chef-server-core-12.3.1-1.el6.x86_64.rpm

chef-server-ctl reconfigure

chef-server-ctl user-create rajachef Raja G raja@myserver.com  abc123 --filename /home/virt01/userkey.pem

Original Syntax : $ chef-server-ctl user-create user_name first_name last_name email password --filename FILE_NAME

chef-server-ctl org-create virt02 "virt02.myserver.com." --association_user virt02 --filename /home/virt02/virt02-validator.pem

Original Syntax: $ chef-server-ctl org-create short_name "full_organization_name" --association_user user_name --filename ORGANIZATION-validator.pem

Step 2: 


chef-server-ctl install opscode-manage --path /home/mypc/chef/chef-manage-2.1.1-1.el6.x86_64.rpm

chef-server-ctl reconfigure

opscode-manage-ctl reconfigure

Step 3: 

chef-server-ctl install opscode-push-jobs-server --path /home/mypc/chef/opscode-push-jobs-server-1.1.6-1.x86_64.rpm

chef-server-ctl reconfigure

opscode-push-jobs-server-ctl reconfigure

Step 4:

chef-server-ctl install chef-sync --path /home/mypc/chef/chef-sync-1.0.0~rc.7-1.el6.x86_64.rpm

chef-server-ctl reconfigure

chef-sync-ctl reconfigure

Step 5: 


chef-server-ctl install opscode-reporting --path /home/mypc/chef/ opscode-reporting-1.5.5-1.el6.x86_64.rpm

chef-server-ctl reconfigure

opscode-reporting-ctl reconfigure

Step 6:


And now install Chef Development Kit.

rpm -ivh chefdk-0.10.0-1.el6.x86_64.rpm

That's it chef server successfully installed in your system. To access chef , just open your browser and type localhost or IP of your PC. And you will get Login page and login with those credentials given initially at Step 1. 

If you are facing any issues please dont hesitate to ask. 

Thank you.

Regards
Raja


Extract log efficiently by using sed

Modification of Log pulling command by using sed

Old command That I use to do log extraction

sed -nre '/12:23:12/,/12:24:12/ p' logfile > /tmp/somelog.txt

But this will take match of given two time stamps at any where in log file.And sometimes from middle of the line which gives obviously wrong log that I need.

So , Now we are modifying sed to look after only at lines starting with timestamp.
It will pull the logs if timestamp exists at beginning of the lines else It wont pull any log.

sed -nre '/^12:23:12/,/^12:24:12/ p' logfile > /tmp/somelog.txt

Note: If you want to make sure that given timestamp existed or not at line starting
you can use

grep -m 5 12:23:12 server.log

The above command ran for 5 first matching of grep and so you can conclude the availability of
given time-stamp in logfile.

For more information please refer sed man page

Hope it will help you.


Changing hostname in CentOS ,Redhat Linux OS

Hello ,

Today lets see an article about changing hostname in CentOS and Redhat.

We have to change hostname in 3 locations to apply changes globally in all locations. 
Configuration filenames :


1. /etc/sysconfig/network
2. /etc/hosts
3. hostname command 

1. Open /etc/sysconfig/network with any editor.
           
                                     
# vim /etc/sysconfig/network


And write/modify line as

                                   
HOSTNAME=


Ex: HOSTNAME=centos.virt02.com

close and save file.

2. Open /etc/hosts file  and add as


                                # vim /etc/hosts

and add as
                           
192.168.56.101 centos.virt02.com centos


close and save file.

3. Now type command hostname to see current hostname . To assign new hostname

                                 
# hostname=centos.virt02.com


after doing all those steps , restart network with
service network restart


Hope it will help you.

Summary :

[root@localhost Tools]# cat /etc/sysconfig/network
NETWORKING=yes
NETWORKING_IPV6=no
HOSTNAME=centos.virt02.com
[root@localhost Tools]# cat /etc/hosts
127.0.0.1               localhost.localdomain localhost
::1             localhost6.localdomain6 localhost6
192.168.56.101 centos.virt02.com centos
[root@localhost Tools]# hostname
centos.virt02.com
[root@localhost Tools]#


How to extract system load through SSH

Hi , with some research I have written these simple scripts which can extract only load average part from uptime command.

these scripts you can use for getting information you requested from remote systems through SSH.

Script #1

#!/bin/bash

for i in localhost 
do
ssh raja@$i $'uptime | awk \'{print $6 $7 $8 $9 $10}\' '
done

Script #2
#!/bin/bash

for i in localhost 
do
ssh raja@$i $'uptime | grep -o "load.*"'
done

Fix conky hiding

I have installed and got some conky script but after system starting its hiding automatically and the only way I can see it while shutting down.

So I have googled and got some solution which can fix my problem.

Open your conkyrc file which is a hidden file  in home directory with

$ vim  .conkyrc

or

$ vim ~/.conkyrc

Find the area of below lines and make the configuration as I have mentioned.

own_window yes
own_window_class Conky
own_window_type normal
own_window_hints undecorated,below,sticky,skip_taskbar,skip_pager 
own_window_transparent yes


Then save and exit from your conkyrc file.

Then in we have to reload the conky with updated configuration , so all you have to do is kill the conky and then start it again.

so In your terminal as root user do as

# killall conky & conky

or

$ su -c " killall conky & conky"

 
I hope that will help you.


See Open Ports in a Linux PC ( Localhost/Remote Machine)

I am writing a small post that will help you just to see what ports are open in  a particular remote/local machine.

we are going to use tool name as nc.

To install it , open your terminal and type as

 # yum install nc


                              After installing , you can use it with

nc -zv xxx.xxx.xxx.xxx <Port>

                                           for example:

nc -zv 192.168.1.100 80

                                          if you want to do that for 2-3 ports

nc -zv 192.168.1.100 80 8009

                                            if you want to do scanning for range of ports

nc -zv 192,168.1.100 80-8080


hope it will help you.

THANK YOU


Tutorial on .htpasswd and .htaccess with apache(httpd) in Linux

If there is a situation that have to dealt with like a public website but with some secret information.
How can we protect the information ? .

We can use .htpasswd and .htaccess in that time.

How  ? Lets see................

Open your terminal and type as

                        vim /etc/httpd/conf/httpd.conf

and find line no : 334 to 338. This is the area of httpd.conf that dealt with .htaccess

    334 # AllowOverride controls what directives may be placed in .htaccess files.
    335 # It can be "All", "None", or any combination of the keywords:
    336 #   Options FileInfo AuthConfig Limit
    337 #
    338     AllowOverride AuthConfig
 

Now look at line no 338 , before modifying it will look like

                     AllowOverride None

You have to modify it to

                     AllowOverride AuthConfig

Now make sure that if you have some website and VirtualHost configuration of that website is successfully completed.


For my case that website is website1.com and now open your terminal and type as

                   #  vim /var/www/html/website1/protected/.htaccess

Then Write below lines

                   AuthUserFile /var/www/html/website1/protected/.htpasswd
                   AuthType basic
                   AuthName " My Personal Files"
                   Require valid-user

So what they means , here we go.....

AuthUserFile  : This is the path of .htpasswd file. Make sure you are giving proper path. If you give wrong path , it wont allow to login. Dont panic we are admins , we can make it solve by giving proper path.

AuthType : The AuthType directive selects that method that is used to authenticate the user. The most common method is Basic, and this is the method implemented by mod_auth_basic. It is important to be aware, however, that Basic authentication sends the password from the client to the server unencrypted. This method should therefore not be used for highly sensitive data, unless accompanied by mod_ssl. Apache supports one other authentication method: AuthType Digest. This method is implemented by mod_auth_digest and was intended to be more secure. This is no longer the case and the connection should be encrypted with mod_ssl instead.

AuthName : So AuthName can be anything , its the name get displayed on that password window.

Require : So this is to define to whom we have to allow to access.

For Example :

Require valid-user  # means only the valid user who are in .htpasswd file
Require raja raaz # means among the users of .htpasswd file allow only raja and raaz

But

Require valid-user raja is wrong way of usage because if you give so it doesnt make any sense.

I hope that explanation is fine. Now save and close that file and now we are going to create users for it.

# htpasswd -c /var/www/html/website1/protected/.htpasswd raja  Password

Location of htpasswd file is completely upto you but .htaccess must be inside of protected directory which intended to be protected.

To add one more user you can use this command
# htpasswd  /var/www/html/website1/protected/.htpasswd raaz  Password

If you mentioned -c here then it will overwrite old .htpasswd file. So dont  mention -c while adding one more user.
Now raja is username and Password is password to access. This will store in  /var/www/html/website1/protected/.htpasswd location. After you added user.

You can try. Just try to access  website1.com/protected in your browser and it will ask you username and password and only allowed are able to access those content.

Hope it helps.

In case of any queries please let me know.


References:

http://www.colostate.edu/~ric/htpass.html
http://www.anchor.com.au/hosting/support/password_protection_using_htaccess
http://www.seas.upenn.edu/cets/answers/auth-htpasswd.html
http://httpd.apache.org/docs/2.2/howto/auth.html


 Thank you

How To do Software RAID using mdadm in CentOS


Today I am writing about how to create Software RAID. Creating Software RAID is pretty easy. All we need either 3 equal size partitions on different harddisks or 3 equal size harddisks.
        In my approach , I am doing this in VmWare by choosing 3 virtual harddisks with equal 1 GB             Size. Our first step is we need to make those harddisks as ready for RAID.

        In your terminal type as

          # fdisk -l
       To see available partitions and then try to create RAID partitions in that.

        If We assume my 3 harddisks as /dev/sdb,/dev/sdc,/dev/sdd then in your terminal

          # fdisk /dev/sdb

        Then
       
         [root@ns1 sysadmin]# fdisk /dev/sdb
WARNING: DOS-compatible mode is deprecated. It's strongly recommended to
         switch off the mode (command 'c') and change display units to
         sectors (command 'u').
Command (m for help): m
Command action
   a   toggle a bootable flag
   b   edit bsd disklabel
   c   toggle the dos compatibility flag
   d   delete a partition
   l   list known partition types
   m   print this menu
   n   add a new partition
   o   create a new empty DOS partition table
   p   print the partition table
   q   quit without saving changes
   s   create a new empty Sun disklabel
   t   change a partition's system id
   u   change display/entry units
   v   verify the partition table
   w   write table to disk and exit
   x   extra functionality (experts only)
Command (m for help): n
          I am selecting new partition here as primary with default size ,( all my 3 VHDS having same size)
Command action
   e   extended
   p   primary partition (1-4)
p
Partition number (1-4): 1
First cylinder (1-130, default 1): 
Using default value 1
Last cylinder, +cylinders or +size{K,M,G} (1-130, default 130): 
Using default value 130
Now we have to change Partition type to RAID , so

Command (m for help): t
Selected partition 1
Hex code (type L to list codes):  fd ( fd for auto RAID)

Now just verify
Command (m for help): p
Disk /dev/sdb: 1073 MB, 1073741824 bytes
255 heads, 63 sectors/track, 130 cylinders
Units = cylinders of 16065 * 512 = 8225280 bytes
Sector size (logical/physical): 512 bytes / 512 bytes
I/O size (minimum/optimal): 512 bytes / 512 bytes
Disk identifier: 0x8a6b2eca
   Device Boot      Start         End      Blocks   Id  System
/dev/sdb1               1         130     1044193+  fd  Linux raid autodetect
All good , we can commit our changes.

Command (m for help): w
The partition table has been altered!
Calling ioctl() to re-read partition table.
Syncing disks.

Same as above do the same for /dev/sdc and /dev/sdd and then finally it will be like


[root@ns1 sysadmin]# fdisk -l
Disk /dev/sda: 21.5 GB, 21474836480 bytes
255 heads, 63 sectors/track, 2610 cylinders
Units = cylinders of 16065 * 512 = 8225280 bytes
Sector size (logical/physical): 512 bytes / 512 bytes
I/O size (minimum/optimal): 512 bytes / 512 bytes
Disk identifier: 0x00092c9c
   Device Boot      Start         End      Blocks   Id  System
/dev/sda1   *           1          64      512000   83  Linux
Partition 1 does not end on cylinder boundary.
/dev/sda2              64        2611    20458496   8e  Linux LVM
Disk /dev/sdb: 1073 MB, 1073741824 bytes
255 heads, 63 sectors/track, 130 cylinders
Units = cylinders of 16065 * 512 = 8225280 bytes
Sector size (logical/physical): 512 bytes / 512 bytes
I/O size (minimum/optimal): 512 bytes / 512 bytes
Disk identifier: 0x8a6b2eca
   Device Boot      Start         End      Blocks   Id  System
/dev/sdb1               1         130     1044193+  fd  Linux raid autodetect
Disk /dev/sdc: 1073 MB, 1073741824 bytes
255 heads, 63 sectors/track, 130 cylinders
Units = cylinders of 16065 * 512 = 8225280 bytes
Sector size (logical/physical): 512 bytes / 512 bytes
I/O size (minimum/optimal): 512 bytes / 512 bytes
Disk identifier: 0x6429c3f4
   Device Boot      Start         End      Blocks   Id  System
/dev/sdc1               1         130     1044193+  fd  Linux raid autodetect
Disk /dev/sdd: 1073 MB, 1073741824 bytes
255 heads, 63 sectors/track, 130 cylinders
Units = cylinders of 16065 * 512 = 8225280 bytes
Sector size (logical/physical): 512 bytes / 512 bytes
I/O size (minimum/optimal): 512 bytes / 512 bytes
Disk identifier: 0xe883f58a
   Device Boot      Start         End      Blocks   Id  System
/dev/sdd1               1         130     1044193+  fd  Linux raid autodetect
Disk /dev/mapper/VolGroup-lv_root: 18.9 GB, 18865979392 bytes
255 heads, 63 sectors/track, 2293 cylinders
Units = cylinders of 16065 * 512 = 8225280 bytes
Sector size (logical/physical): 512 bytes / 512 bytes
I/O size (minimum/optimal): 512 bytes / 512 bytes
Disk identifier: 0x00000000

Disk /dev/mapper/VolGroup-lv_swap: 2080 MB, 2080374784 bytes
255 heads, 63 sectors/track, 252 cylinders
Units = cylinders of 16065 * 512 = 8225280 bytes
Sector size (logical/physical): 512 bytes / 512 bytes
I/O size (minimum/optimal): 512 bytes / 512 bytes
Disk identifier: 0x00000000
Now we have to create RAID, Here I am choosing RAID 5 which needs minimum 3 RAID Harddisks

[root@ns1 sysadmin]# mdadm --create /dev/md0 --level=5 --raid-devices=3 /dev/sdb1 /dev/sdc1 /dev/sdd1
mdadm: Defaulting to version 1.2 metadata
mdadm: array /dev/md0 started.
RAID 5 Created. --level indicates RAID level and after number and name of the devices.

To see your RAID Information execute this command

[root@ns1 sysadmin]# mdadm --detail /dev/md0
/dev/md0:
        Version : 1.2
  Creation Time : Tue Nov 11 00:05:20 2014
     Raid Level : raid5
     Array Size : 2086912 (2038.34 MiB 2137.00 MB)
  Used Dev Size : 1043456 (1019.17 MiB 1068.50 MB)
   Raid Devices : 3
  Total Devices : 3
    Persistence : Superblock is persistent
    Update Time : Tue Nov 11 00:05:26 2014
          State : clean
 Active Devices : 3
Working Devices : 3
 Failed Devices : 0
  Spare Devices : 0
         Layout : left-symmetric
     Chunk Size : 512K
           Name : ns1.example.com:0  (local to host ns1.example.com)
           UUID : af2998ef:acc6cb1e:feb832f1:7f9b2f1b
         Events : 18
    Number   Major   Minor   RaidDevice State
       0       8       17        0      active sync   /dev/sdb1
       1       8       33        1      active sync   /dev/sdc1
       3       8       49        2      active sync   /dev/sdd1
Then we have to save our RAID Configuration.

In CentOS configuration file : /etc/mdadm.conf
In Debain baed /etc/mdadm/mdadm.conf

So save the configuration with

[root@ns1 sysadmin]# mdadm --detail --scan
ARRAY /dev/md0 metadata=1.2 name=ns1.example.com:0 UUID=af2998ef:acc6cb1e:feb832f1:7f9b2f1b
[root@ns1 sysadmin]# mdadm --detail --scan > /etc/mdadm.conf
[root@ns1 sysadmin]# 

if you want to see stats of your RAID

[root@ns1 sysadmin]# cat /proc/mdstat
Personalities : [raid6] [raid5] [raid4] 
md0 : active raid5 sdd1[3] sdc1[1] sdb1[0]
      2086912 blocks super 1.2 level 5, 512k chunk, algorithm 2 [3/3] [UUU]

To set any RAID Disk as failed/faulty

# mdadm --fail /dev/md0 /dev/sdb1

To Remove any Disk from RAID

# mdamd --remove /dev/md0 /dev/sdb1

To add new disk

# mdadm --add /dev/md0 /dev/sdb1

If harddisk/partition has taken from another RAID , to flush all data in it before using into a new RAID

# mdadm --zero-superblock  /dev/sda1

Stop a Running RAID

# mdadm --stop /dev/md0

and to start

# mdadm --run /dev/md0 

Its supposed to run but with research i have done it wont run/start.

To start it we have to do like assembling again

# mdadm --assemble /dev/md0 /dev/sda1 /dev/sdb1 /dev/sdc1 

If you UUID of /dev/md0 it will be more easier and perfect.

# mdadm --assemble --scan --uuid=af2998ef:acc6cb1e:feb832f1:7f9b2f1b


Source:

http://www.devil-linux.org/documentation/1.0.x/ch01s05.html
https://raid.wiki.kernel.org/index.php/RAID_setup


VSFTPD - Passive mode port configuration

If your FTP got configured in Passive mode then to allow data transfers , you must to this.


##########/etc/vsftpd/vsftpd.conf################3

pasv_min_port=49152
pasv_max_port=65534

#############/etc/sysconfig/iptables-config##############

IPTABLES_MODULES="ip_conntrack_ftp"

Famous SELinux Contexts

1. httpd SELinux context

                                        chcon -v --type=httpd_sys_content_t /path/to/dir

2.httpd SELinux context

                   chcon -Rv --type=httpd_sys_content_t /path/to/dir

3. Restore old/default context

                   restorecon -Rv -n /var/www/html


                    ;  -n switch to prevent any relabelling occurring.
4. Changing default port for services permitted SELinux

                                     #  semanage port -l
                    # semanage port -a -t http_port_t -p tcp 81
5. For Nagios

chcon -R -t httpd_sys_content_t /usr/local/nagios


  1st command to see what are the supported services. 2nd one changing default port for http service.


Note: Give me time to write them with proper explanation. 

More: http://wiki.centos.org/TipsAndTricks/SelinuxBooleans

Automation with Cron

In every linux cron service we found and it is most familiar command to every system administrator. I am proud to be one of them.

CRON - Introduction :

The cron is a daemon and we can manage it with service names crond. Cron is the best solution in all sort of Linux Operating systems to run scritps,commands at a determined or specified time. So as I did mentioned it is a service it will start with system and do its running as long as system running.

Generally cron will executes commands or scripts in "sh" shell (/bin/sh) . If you want to run your script in a different shell dont forget mentioning it before executing the command.

Cron Configuration file will be called as cron table and we can invoke it with command named as "crontab". Every user in linux have his/her own crontab and all users cron configurations will store at /var/spool/cron. All the cron jobs will be recorded at location /var/cron/log or /var/adm/cron/log.

CRON - Format :

Minute     Hour      DayofMonth      Month      Weekday     Command

Minute           Minute of the Hour         0 to 59
Hour               Hour Of the day             0 to 23
DOM              Day of month                 1 to 31
Month             Month of the yead          1 to 12
Weekday         Day of the week             0 to 6( 0 = Sunday)

In Cron scheduling if specific value not mentioned then automatically it will consider it for everytime. Unspecified part will have value as '*'. If particular field got particular value then it will executes at that time.Two integers separated by a dash mention like range. Range followed by a step value is nothing but period.Comma separated for all possibilities.

For Example:

1.        45 10 * * 1-5 echo " hi " > /dev/console

So 45 is Minute ,10 Hour, * for all & again * ,1-5 Range for weekday.

i.e Every Monday to Friday at time of 10:45 say "hi" and send to /dev/console.

2.         0,30 * 13 * 5 echo " hi "

So 0,30 i.e at every 0 min ( starting sec of a min) and after 30 Min , * for hour i.e for all hours ,13th of month and * for every month and 5 of the week  i.e Friday.

So the above time saying like

Everymonth 13th and everymonth Friday at every half -n-hour execute echo "hi" command.

3.    20 1 * * * find /tmp -atime +3 -type f -exec rm -f { } ';'

20 for minute
1 for Hour

* for day of month means all days of month ( 1-30)
* for month means all month (1-12)
* for weekday means for all days of a week ( 0-6)

So Everyday,Everyweek, Every month at time of 1:20 execute that script or command. and command simple finding unused file in /tmp for 3 days and removing it.

4.  10 10 1-30/2  * * echo " Hi"

command will execute at 10  hr :10  hr everymonth & everyweek but every odd date only.

NOTE: Cron have a small problem , that it wont load .profile or bashrc while executing commands , so if your script is have anything to do with environment variable you must have to mention it with in script.


CRON - Management :

crontab -e : To edit crontab
crontab -l : To list cron jobs
crontab -r : Remove all cron jobs

As I did mentioned every user have his own cron configuration file , root user can manage other user cron jobs with above commands. for example

crontab -e raja : edits raja crontab
crontab -l raja : list cron jobs of raja
crontab -r raja : removes cron jobs of raja


System administrators have a choice like which user allowed to do cron jobs and which are not.

If username exists in cron.deny then he wont be allowed for cron automation and if he does in cron.allow. In Linux by default all are allowed , so you can use cron.deny to block particular user for cron. But HP Linux only root user allowed by default and everyuser must be in cron.allow if we have ti allow cron and same for cron.deny to block.

Location : /etc


CRON - MORE :

Almost all Linux's have cron pre installed and have some crontab entries too which are pre installed.

/etc/cron.daily - all scripts in /etc/cron.daily  will execute scripts once a day.
/etc/cron.weekly - here scripts will run once per a week.


I hope it will help you to understand a little bit about cron. If you know advanced than this please let me know.

Help Helps You.

Raja


Reset root password in CentOS 6

In CentOS base version , I mean v6 there is a bug and you cant reset the password in the usual way. I am going to mention both the ways.

To reset root password of CentOS machine, Start your PC. You will get GRUB screen and there choose " e" to edit booting kernel. After that It will open in a new window with current configuration.

If you observe there you can find a line with two last words like  " rhgb quiet \" Dont worry about "\" , use backspace and remove " rghb quiet". Then add in that line as " a 1 " and then press F10 key to boot. it will successfully boot into /bin/sh and there by using passwd command you can reset the root  password of the server.

If its not working .

1 . SELinux may be causing the problem , to take care of it you have to restart Machine and again edit GRUB , but this time we have to one more parameter extra.

Now add parameters like " a selinux=0 1 " , So CentOS will boot into /bin/sh with permissive mode of selinux.

2. Authentication Token manipulation error

Simple , the root partition has mounted as read-only so you are unable to write( password update -new password writing ) anything to root directory. so you have to remount it with read-write access & of course you are a root user .

mount -o remount, rw /

So after that try again with passwd command to reset the password.

Hope it helps.


Explanation of /etc/fstab

What is fstab file?

fstab is a configuration file that contains information of all the partitions and storage devices in your computer. The file is located under 
/etc, so the full path to this file is /etc/fstab.

/etc/fstab contains information of where your partitions and storage devices should be mounted and how. If you can't access your Windows partition from Linux, aren't able to mount your CD or write to your floppy as a normal user, or have problems with your CD-RW, you probably have a misconfigured /etc/fstab file. So, you can usually fix your mounting problems by editing your fstab file.

/etc/fstab is just a plain text file, so you can open and edit it with any text editor you're familiar with. However, note that you must have the root privileges before editing fstab. So, in order to edit the file, you must either log in as root or use the su command to become root.

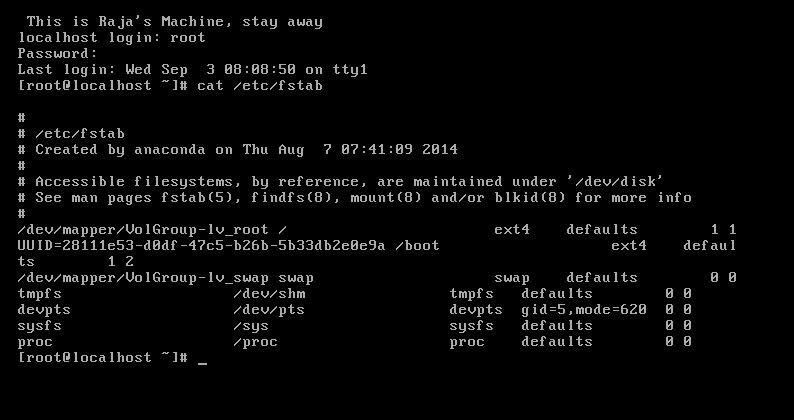
Sample fstab file looks like this

Note that this system has two IDE partitions, one which is used as /, and the other used as /home. It also has two DOS partitions which are mounted under /mnt. Note the user option provided for the cdrom, and the floppy drive. This is one of the many default parameters you can specify. In this case it means that any user can mount a cdrom, or floppy disk. Other options will be dealt with later.

fstab file format explination

fstab consists of a number of lines (one for each filesystem) seperated into six fields. Each field is seperated from the next by whitespace (spaces/tabs).

So from the example given previously:

/dev/hdc /mnt/cdrom iso9660 noauto,ro,user 0 0

 first field (/dev/hdc) is the physical device/remote filesystem which is to be described.

 second field (/mnt/cdrom) specifies the mount point where the filesystem will be mounted.

 third field (iso9660) is the type of filesystem on the device from the first field.

 fourth field (noauto,ro,user) is a (default) list of options which mount should use when mounting the filesystem.

 fifth field (0) is used by dump (a backup utility) to decide if a filesystem should be backed up. If zero then dump will ignore that filesystem. The sixth field (0) is used by fsck (the filesystem check utility) to determine the order in which filesystems should be checked.

If zero then fsck won't check the filesystem.
(as the example line above is a cdrom there is very little point in doing a fsck on it, so the value is zero).

File system mount options

As the filesystems in /etc/fstab will eventually be mounted using mount(8) it isn't surprising that the options field simply contains a comma-seperated list of options which will be passed directly to mount when it tries to mount the filesystem.

The options common to all filesystems are:

sync / async
All I/O to the file system should be done (a)synchronously.
auto
The filesystem can be mounted automatically (at bootup, or when mount is passed the -a option). This is really unnecessary as this is the default action of mount -a anyway.
noauto
The filesystem will NOT be automatically mounted at startup, or when mount passed -a. You must explicitly mount the filesystem.
dev / nodev
Permit any user to mount the filesyste. This automatically implies noexec,
exec / noexec
Permit/Prevent the execution of binaries from the filesystem.
suid / nosuid
Permit/Block the operation of suid, and sgid bits.
ro
Mount read-only.
rw
Mount read-write.
user
Permit any user to mount the filesystem. This automatically implies noexec, nosuid,nodev unless overridden.
nouser
Only permit root to mount the filesystem. This is also a default setting.
defaults
Use default settings. Equivalent to rw,suid,dev,exec,auto,nouser,async.
There are numerous options for the specific filesystes supported by mount.
However these are some of the more useful, for the full list check out the man page for `mount`.
ext2
check={none, normal, strict}
Sets the fsck checking level.
debug
print debugging info on each remount.
sb=n
n is the block which should be used as the superblock for the fs.
fat
check={r[elaxed], n[ormal], s[trict]}
Not the same as ext2. Rather deals with allowed filenames. See mount man page.
conv={b[inary], t[ext], a[uto]}
Performs DOS<->UNIX text file conversions automatically. See mount man page.
uid=n, gid=n
iso9660
norock
Disables Rock Ridge extensions.

fstab file Supported file systems list

affs - I have know idea what this is, if anyone else does please enlighten me.

coherent

ext - Don't use this. ext has been superseded by ext2.

ext2 - The standard Linux filesystem. (NB, this has nothing to do with extended partitions.)

fat - DOS.

hpfs - OS/2 High Performance File System.

iso9660 - CD-ROM's. Supports Rock Ridge extensions by default.

minix - can be useful for floppy disks.

msdos - Just fat with some addtional error checking.

nfs - Network FileSystem. Dealt with later.

proc - The process psudeo-filesystem now standard in Linux.

smb - Another network filesystem. Compatable with WFW, and NT. See Samba.

ufs - Unix FileSystem.

unsdos - Unix filesystem on a FAT partition.

vfat - MS's kludge of FAT to provide long filenames.

xenix

xiafs

Process Management

Hello , My new blogpost is about Process Management and I have gone all concepts of Process Management. I have written this document with help of .Doc and it consists of images. So its hard to maintain the format in blogger too. I am placing the download link , Please use that link to download. I hope it helps you. To Download my post Please click here

SSH configuration: sshd_config file

In SSH Server , we do have two types of configuration files. They are sshd_config and ssh_config.

Here sshd_config is all about server side configuration. The behavior of SSH server written at this file.

In this article I am writing a simple article with few best practices over sshd_config.

Note: For edit that you are doing to sshd_config , you must restart sshd service. Please review my last article about ssh restart.


1. Allow login only with root and deny all other.

This is actually simple. In the terminal type as a root user as menioned below

# touch /etc/nologin


That's it. Then restart sshd service. Now try with normal user and you wont be allowed to login.

2.SSH Protocol switching.

SSH have two versions as Version-1 , Version-2
Version-1 have only feature that user based authentication.Due to this we can only know who is getting login into server but we cant see from which machine or host he is doing this and this machine may be authorized or unauthorized. Due to this its not safe to use Version 1 in real time.

Version-2 overcomes this problem with Version-1 with host-based authentication process and along with user-based authentication process.

First It will take the host Identity and then only it will allow user to login.

You can set your version of SSH with

Protocol 2

in sshd_config file at line line number 21.

3. Disabling direct root login

So first login should be normal user login and then only he can switch into a root user if he know the root password. This is one of the best practice. and to do that open sshd_config file with

# vi /etc/ssh/sshd_config


Find or write a line as

PermitRootLogin no


then save & close, then restart sshd service.

4.Allow only specific users.

Assume we have 100 users in network and you dont want them to login through ssh. You can simply allow particular users to login and deny all other.

Open your configuration file

# vi /etc/ssh/sshd_config


Then write a line as

AllowUsers user1 user2 user3


user1,user2,user3 are usernames.

save ,close. restart sshd service.

5. Deny only specific users.

Same case as above but you want only part of them to deny and allow all others.

# vi /etc/ssh/sshd_config


DenyUsers user1 user2 user3

6.Disconnect Idle ssh sessions after a timeout.

Open your sshd_config file and write the lines as below and it will disconnect the sessions after time out. In the example it is 300 Sec i.e 5 Min.

# vi /etc/ssh/sshd_config


then add

ClientAliveInterval 300

ClinetAliveCountMax 0


save,close & restart sshd service.

7.Display Banner information to all who are trying to connect.

Now make a file with information you want to display , assume I have information made at location /etc/issue. Now I can display the information of at /etc/issue to all by making as below

Open file

# vi /etc/ssh/sshd_config


then add

Banner /etc/issue


save,close and restart sshd service.

8.Port Number change

This is also one of the best security practice. Default SSH port is 22 and attackers first choice will be 22. So we have to change it to something else.

Open configuration file

# vi /etc/ssh/sshd_config


then write a line as

Port 2222


save,close. Now as per configuration file ,ssh default port is 2222 but unless we made changes in IPTables it wont work for remote connections.

# vi /etc/sysconfig/iptables


Then modify the line which have port 22 ,else remove it and add the new line as below.

-A INPUT -m state --state NEW -m tcp -p tcp --dport 2222 -j ACCEPT


then save and close the file and restart iptables with

# service iptables restart


9. Allow only particular IP

This is awesome thing , who ever the attacker he cant do anything unless he is doing from authorized machine network address.

This we can do in 3-ways and we can assume it as 3-level security arrangement.

Method-1 : IPTables , assume you want only 192.168.1.2/24 network only to access your ssh service. Then open your IPtables at server end and type as mentioned below before commit,

-A INPUT -s 192.168.1.2/24 -m state --state NEW -m tcp -p tcp --dport 2222 -j ACCEPT


then save,close and restart IPTables with

# service iptables restart


Method 2 : From sshd_config.

Edit configuration file and write as mentioned below.

# vi /etc/ssh/sshd_config


then add line as

ListenAddress 192.168.1.2/24


save,close & restart sshd service.

Method 3: TCPWrappers

If you mentioned IP in at /etc/hosts.allow then for that IP , mentioned service will be allowed and if you mention the same in /etc/hosts.deny then for that IP , mentioned service will be deny.

For example look at below case.

# vi /etc/hosts.allow


then add

sshd : 192.168.1.2/24


save ,close. No need restart. Now only the mentioned IP will be allowed for ssh access.

Now /etc/hosts.deny

# vi /etc/hosts.deny


sshd : 192.168.1.2/24


save,close. Now from this IP all ssh request will be denied.

I will write an article about TCPWrappers soon.


TCPWrappers loading order as first /etc/hosts.allow file and then /etc/hosts.deny file. So make sure about the flow and understand it.

12. Deny Empty password login.

This is not a good habit, login with empty password so do as below in your config file

# vi /etc/ssh/sshd_config


add as

PermitEmptyPasswords no


save,close and restart sshd service.


If you are having any other Information about sshd_config configuration, Please add in comments area and I will add it in main post.

Help helps you.